Remember the panic of fumbling for your wallet at a busy checkout, digging for the right card while a line forms behind you? In today’s fast-paced world, that moment is quickly becoming a thing of the past. The way we pay for everything, from our morning coffee to our weekly groceries, is being revolutionized by a powerful tool already in your pocket: your smartphone. This is all thanks to the mobile wallet.
A mobile wallet is a digital version of your physical wallet, stored securely on your phone. It offers convenience, enhanced security, and lightning-fast transactions. If you’re looking for an efficient, safe, and reliable way to pay, this guide is for you.
At Remitly, we’re dedicated to making financial tools accessible and easy to understand. In this article, we’ll explain what a mobile wallet is, why it’s useful, and the simple, secure setup process.
What is a mobile wallet?
In the simplest terms, a mobile wallet is an app on your smartphone that securely stores digital versions of your debit and credit cards. Instead of carrying a bulky wallet, you can use your phone to make payments in stores, in apps, and online. The most popular examples in the United States are Apple Pay (for iPhones), Google Pay (for Android phones), and Samsung Wallet (for Samsung devices).
How the technology works: NFC and tokenization
Most in-person payments use Near Field Communication (NFC) technology. This is a short-range wireless signal that allows your phone and the payment terminal to communicate when they are held close together, usually within a couple of inches. It’s the same technology used in physical tap-to-pay credit cards.
The real magic, however, is in the security. When you add a card to your mobile wallet, the app works with your bank to create a unique digital account number, or a “token.” This process, called tokenization, is the key to its safety.
When you pay, the wallet sends this one-time token and a dynamic security code to the payment terminal—your actual card number is never shared with the merchant or stored on your device. This makes it incredibly secure.
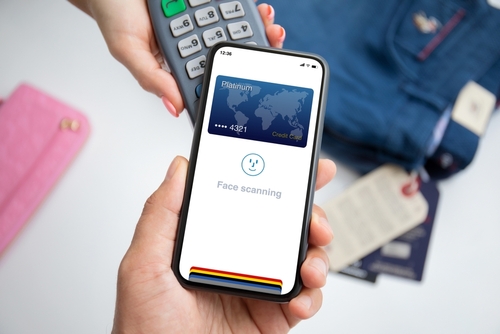
The security behind the tap
All of this is protected by your phone’s security features, like your PIN, fingerprint, or Face ID. This means only you can authorize a payment. Unlike a physical card that can be stolen and used immediately, a thief can’t simply grab your phone and start spending.
The top 5 benefits of using a mobile wallet
Switching from a physical wallet to a digital one offers some significant advantages that go beyond just looking futuristic at the checkout.
1. Unbeatable convenience
Your phone is likely with you all the time anyway. With a mobile wallet, you can go for a run, grab a coffee, or pick up groceries without needing to carry a bulky wallet or purse. Many mobile wallets also allow you to store loyalty cards, boarding passes, concert tickets, and transit passes, truly consolidating everything you need into one device.
2. Fort Knox-level security
Using a mobile wallet is often more secure than using your physical credit card. Why? Because of tokenization. If a store you shop at experiences a data breach, your actual card number isn’t stored in their system, so it can’t be stolen. Furthermore, every transaction must be authenticated by you using your Face ID, fingerprint, or PIN. A thief can’t simply grab your phone and start spending, unlike a physical card.
3. Lightning-fast transactions
The “tap-and-go” process is incredibly fast. Instead of inserting a chip and waiting, you simply unlock your phone and hold it near the contactless reader. The transaction is typically processed in a matter of seconds, helping you get through checkout lines much faster.
4. More than just payments
Modern mobile wallets are becoming command centers for your daily life. You can use them to:
- Send money to friends and family directly through messaging apps.
- Pay for public transportation in major cities by tapping your phone at the turnstile.
- Speed through online checkout by using the “Pay with Apple Pay/Google Pay” button, which saves you from having to manually enter your card and shipping information on every website.
5. An eco-friendly choice
Every digital transaction is a paperless one. By reducing the need for printed receipts, you’re making a small but meaningful contribution to reducing paper waste.
How to set up a mobile wallet in 5 simple steps
Getting started with a mobile wallet is surprisingly easy. Here’s a detailed walkthrough of the secure mobile wallet setup process.
Step 1: Choose the right mobile wallet for your phone
The good news is that your phone will usually decide this for you.
For iPhone users: You’ll be using Apple Pay, which is built directly into the iOS operating system.
For Samsung users: You have the choice of using Samsung Wallet or Google Pay. Samsung Wallet has a slight edge on Samsung devices as it can sometimes work with older magnetic-stripe card readers that don’t have NFC.
For all other Android users: Google Pay is the standard and most widely supported mobile wallet.
Step 2: Download or locate the app
- On an iPhone, the Wallet app is pre-installed. Just find the icon on your home screen.
- On a Samsung phone, the Samsung Wallet app is also typically pre-installed.
- On other Android phones, if Google Pay isn’t already on your device, you can download it for free from the Google Play Store.
Step 3: Add your payment methods securely
This is the core of the setup process.
- Open your wallet app.
- Tap the “+” sign or the “Add to Wallet” button. You’ll usually see this in the top-right corner.
- Position your debit or credit card in the frame on your screen. Your phone’s camera will automatically scan and capture the card number, expiration date, and your name. You can also enter these details manually.
- Enter the 3-digit security code on the back of your card.
- Verify your card with your bank. They will generally send you a one-time verification code via text message or email, or you may be prompted to log into your mobile banking app to approve the addition.
- Once verified, your card will appear in your mobile wallet, ready to use. You can repeat this process to add multiple cards.
Step 4: Set up your security features
Before you start using your wallet, make sure your phone is secure.
Set a strong screen lock: A PIN, pattern, or password is required. Your mobile wallet will not work without this basic layer of security.
Enable biometric authentication: Go into your phone’s settings and turn on Face ID (for iPhones) or Fingerprint Unlock (for Androids). This is the most secure way to authenticate your payments.
Turn on transaction notifications: In your wallet app settings, enable notifications so you get an alert every time a transaction is made. This allows you to immediately spot any unauthorized activity.
Step 5: Make a test purchase
The best way to get comfortable is to try it out.
- Look for the contactless symbol at the checkout counter. It looks like a series of four curved lines, similar to a sideways Wi-Fi symbol. It’s now available at the vast majority of retailers.
- When it’s time to pay, unlock your phone using your face or fingerprint. This automatically readies your default card for payment.
- Hold the top of your phone near the payment terminal. You don’t need to touch it, just bring it within an inch or two.
- You’ll feel a slight vibration, hear a chime, and see a checkmark confirming payment. That’s it!
Once you’re comfortable with in-store payments, explore what else your wallet can do. Try adding a loyalty card or using it at an online checkout with Apple Pay or Google Pay.
Welcome to the future of payments
Setting up a mobile wallet is a simple step that can make a big difference in your daily life. It adds an extra layer of convenience and security to your transactions.
By following this guide, you can confidently embrace this modern payment method and enjoy the peace of mind that comes with using secure, reliable technology. Welcome to a faster, safer, and simpler way to pay.
And when it comes to sending money internationally, Remitly makes it just as easy, secure, and convenient.
FAQs
Is it really safe to use a mobile wallet?
Yes. With tokenization, your actual card number is never shared with merchants. Each purchase also requires biometric authentication or a PIN, making it one of the most secure ways to pay. In fact, it’s often safer than carrying physical cards, which can be lost or stolen.
What can I use my mobile wallet for?
You can use it for almost anything. This includes in-store purchases at grocery stores, restaurants, and retail shops; public transport in many major cities; online checkouts with the “Pay with Apple/Google Pay” button; and even sending money to friends and family.
Are there any extra fees for using a mobile wallet?
No. Mobile wallet apps are free to download and use. Apple, Google, and Samsung don’t charge fees for payments. Any fees you might encounter are related to your bank or credit card (for example, credit card interest), not the wallet itself.
What happens if I lose my phone?
Even if your phone is lost or stolen, your mobile wallet stays protected. It can’t be accessed without your PIN or biometrics. You can also use your phone’s built-in safety tools, such as Find My iPhone (Apple) or Find My Device (Android), to remotely lock or erase your phone. This will also deactivate your mobile wallet. Just log in to your Apple or Google account from any browser to take action.