Key Highlights
- Passport photos must follow strict rules from the Department of State. These rules include how your face should look, the lighting, and the photo’s clarity.
- Many photos get turned down because of glare from eyeglasses, an incorrect background, or the head not being in the right place (from the bottom of the chin to the top of the head).
- If your photo is turned down, it is important to see why it was denied before you fix it with the right details.
- To avoid problems, use natural light, keep a simple facial expression, and make sure the size is correct.
- Getting professional help can make things easier and ensure your photo meets all the rules.
Now, let’s see why getting the right passport photo matters for your passport application.
Rejected passport photos can ruin your passport application and delay your travel plans. It’s important to follow the rules when you send a digital or printed passport photo. Passport agencies and the Department of State have specific guidelines to ensure your photo is accepted. Knowing why photos get rejected and how to fix the issues can help you save time and feel less stressed. Let’s review the main things you should know to get this done right.
Understanding Passport Photo Requirements
Passport photo requirements create a uniform look for identification checks. They include clear rules to ensure your face is properly aligned according to the International Civil Aviation Organization (ICAO) standards. This is important whether you are going on a family vacation or a business trip.
Knowing these important guidelines can help you avoid a rejection. They can also make your passport application process easy. When you know how to take the right photos, it can create a calm experience. Here are clear steps for taking acceptable passport photos.
Key guidelines for acceptable passport photos
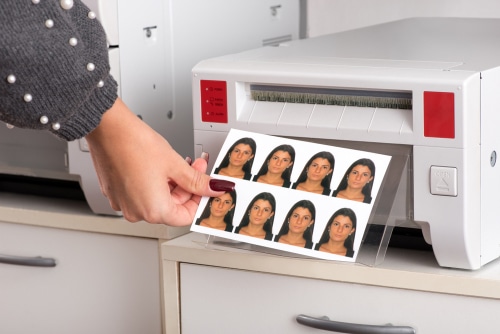
Your passport photo must follow specific rules made by the government. First, it should display your full face. Make sure it is clear from the top of your head to the bottom of your chin. Your face needs to be centered, with enough space around it.
Second, lighting matters a lot. Good lighting stops shadows that can cover your face features. It also helps your natural skin tones to show well. Photos that are too bright or too dark will not be accepted. Use soft lighting for the best results.
Lastly, the background needs to be plain white or a light shade. It should not have any textures or shadows. Using editing tools or filters to change the photo will not meet the rules. If you follow these guidelines, your photo should be accepted without issues. Next, let’s go over some common reasons why photos get rejected.
Common reasons for photo rejection
Eyeglasses can make it hard to take good passport photos. If there is a glare on the lenses or frames and it blocks your eyes, your photo may be turned down. It’s better to remove your glasses unless you really need to wear them because of health issues. If you do, you must show a signed note from your doctor.
Your facial expression matters a lot. You should have a calm look. This means both eyes need to be open, and your mouth should be closed. If you make any funny faces or squint, you might be disqualified. By following these rules, your photos will stand a better chance of being approved by passport agencies.
Poor lighting can cause issues as well. If there are shadows on your face or the photo does not show natural skin tones, it might get rejected. You should have steady lighting and clear image quality. You should also find ways to stop your photo from being rejected.
Steps to Take After Passport Photo Rejection
Getting your passport photo rejected can be frustrating, but you can solve it. First, check the rejection notice from the Department of State or the passport agency. This notice often tells you what was wrong with your photo.
Once you know the problems, make the changes using tools like digital cameras or expert help. Make sure to fix issues like glare or unflattering expressions. By doing this, you can fix the mistakes and keep your application process going without any trouble.
Reviewing the rejection reasons
The first step after a rejection is to learn why your photo does not meet passport photo rules. You will receive a clear explanation from the Department of State or a passport agency about what went wrong.
Make sure to see if there are key problems like head position—from the top of the head to the bottom of the chin—or if the lighting or background is bad. Finding these out is important to avoid getting turned down again. Digital passport photos can also fail if the resolution hides aspects of the face.
Carefully read the notes you got. Pay attention to small details, like if you should take off your glasses or change your expression to fit acceptance standards. Once you check everything, it will be easier to make changes. Now, let’s see how to fix your photo.
Correcting your passport photo
To fix rejected passport photos, you should start with the right steps. First, take a new photo using a digital camera that has good quality. This will help to prevent blurry pictures. Make sure your face is in the center, from the top of your head to the bottom of your chin.
Next, choose a white or light background that is free of shadows and patterns. If your photo was not accepted because of hats or sunglasses, take them off. You can also include signed statements if you need to wear them for health or religious reasons.
If you need more help, think about contacting passport agencies. They may provide services to crop or adjust your photo. You can also choose to hire a professional photographer to make sure your picture meets the necessary rules. Doing this can increase your chances of getting your passport approved next time.
Tips for Taking Compliant Passport Photos
Getting the right passport photo can reduce the chances of it being turned down and make your application easier. First, know the basic rules: use even lighting, keep a simple face, and frame your head properly. These are important.
When you take photos for family trips or your travel, pay attention to every detail. Look at the background, your outfit, and how you appear in the picture. The tips below will help ensure your passport photo meets the Department of State’s standards the first time you take it.
Best practices for a successful passport photo
Follow these tips to take a good passport photo:
- Keep a calm look on your face. Your eyes need to be open, and your mouth should stay closed.
- Ensure the light is even. It should show your real skin tones without any dark spots.
- Look at the size. Pay attention to where your head is. There should be good space between the top of your head and your chin.
- Use a simple white or off-white background. There should be no designs or lines.
- Take the picture with a high-quality camera. Avoid a blurry or fuzzy photo.
If you follow these steps, your digital passport photo should be accepted. Next, we will discuss mistakes to avoid for compliance.
Avoiding common mistakes in passport photography
Wearing sunglasses or colored lenses may cause rejection. If you wear them for style or health reasons, make sure to remove them unless necessary. A note from a doctor can help explain their purpose.
Bad lighting can create bright spots or dark areas in your photos. Choose lighting setups that light up your face evenly. This should feel like natural light. Shadows can make your images look unclear and may lead to problems during review.
Remove any distractions in the background. This means no textured walls or visible items in the picture. Making the right changes helps make sure every detail matches the standards set by the Department of State or other nations. Let’s consider getting professional help for better results.
Professional Help for Passport Photos
Getting a good passport photo can be hard. A professional photographer can help you follow all the passport photo rules. They understand how to avoid common problems like bad light, wrong angles, or low quality.
Whether you pick online services or go to a studio, experts help make travel plans and the paperwork for international child issues easier. Keep reading to learn more about when and why you should use these services.
When to consider professional photography
Think about using a professional photographer if you keep getting rejections. A person who knows how to take passport photos understands important details, like getting the right face measurements and using good lighting for natural skin tones.
These photographers use new digital tools. This helps them avoid common problems, like blurry images or low quality. The advantages include making sure the photos follow ICAO rules and that they are suitable for different types of submissions.
This service is great for people who need important travel copies, like new passport or endorsement pictures. With the right preparations, you can feel sure that your documents will be approved in time.
Choosing a good photographer for your passport photos is important.
Choosing the right photographer is very important for doing well. Look at their help with passport services. Make sure they understand the Department of State’s rules. Their samples should show neutral expressions and plain off-white backgrounds clearly.
Check local studios that offer passport services. Ask about their prices so you know what to expect, and make sure the quality is good. It’s also important to ask if they offer print or digital options, as these can vary. Additionally, inquire if they provide assistance on how to apply for a child passport, as the process can be different from applying for an adult passport. Knowing the necessary documentation and requirements ahead of time can save you a lot of hassle. Finally, it’s beneficial to check reviews or testimonials from previous customers to ensure that you’ve chosen a reliable service.
Many passport agencies have websites with lists of experts. These lists can help you find reliable photographers. They can assist in making sure your application is approved.
Frequently Asked Questions
What are the most usual mistakes on passport photos that get rejected?
Common mistakes include wearing eyeglasses that cover your eyes or have glare. Using odd facial expressions instead of normal ones is also a mistake. Be careful about creases or damage on the photos too. Check that your headwear is right. Follow the rules for the frames of the eyeglasses. Do not use textured backgrounds for approval.