
Today, most payments happen with a click of a button. It’s easy to assume paper checks are now outdated, things of the past. But the truth is, they’re not extinct just yet, and you might find yourself needing to write one when you least expect it. Knowing how to write a check remains an important skill, even in a digital world.
Checks were once king when it came to making payments. Today, even in the age of digital mobile wallets and instant transfers, there are still situations where a check may be your most reliable option. Remitly recognizes how rapidly the world of payments is evolving and wants to keep you informed—on everything from checks to digital transfers.
In this guide, we’ll break down how to write a check, walk you through the key security steps, and provide additional tips to help you feel confident.
Understanding the parts of a check before you fill it out
To get a checkbook of your own, you can reach out to your bank or use their online platforms to request checks be mailed to you. Checks in the US have a standard layout regardless of which bank you use, with only slight variations, like whether the memo line says “Memo” or “For.”
Before you start writing out your first check, it helps to know what each section of a check is for. Every line, number, and box has a purpose. Once you understand the layout, it’ll be easier to avoid mistakes.
The key sections of a check
| Your name (pre-printed) 872
Address (optional) Date ______________ Pay to the order of ________________[Name of recipient]_______________ $ [Amount] ________________[Amount written in words]__________________________ DOLLARS BANK NAME (pre-printed) Memo _____________ ____________[Your signature]________MP |:123456789 |: 123456789||l 1234 |
Here’s what each element on a check means:
- Your information: Your name is usually pre-printed in the upper left-hand corner. You can also have your address printed, but this is optional at many banks. This identifies you as the account holder.
- Check number: The check number is pre-printed in the upper right-hand corner. The number is different on every check.
- Date line: Found on the upper right of the check, below the check number, this is where you write the current date. In the US, the correct format is month, day, year.
- “Pay to the Order of” line: This line is where you write the name of the person or business that will receive the money.
- Amount Box ($): The small box at the end of the “Pay to the Order of” line is where you write the amount you wish the person to receive in numerical form.
- Amount line (Dollars): Write the payment amount in words on the longer line beneath the payee’s name. This written amount is the official and legally binding one, preventing any confusion about the total.
- Memo or For line: A short line in the bottom left corner is where you can note what the payment is for. For example, “June rent” or “Christmas gift.”
- Signature line: The bottom right line is for your signature. A check without your signature isn’t valid and cannot be cashed by the recipient.
- Routing and account numbers: At the very bottom of the check, you’ll see numbers that refer to your account number and your bank’s routing number. This helps identify which account the funds are coming from.
Most checks come as a booklet (checkbook) and include a check log for you to record details of every check you write. Every check is officially numbered. You can note the check number, recipient, amount, and date in your log.
Keeping this information can be invaluable in case a check goes missing or needs to be stopped. If something goes wrong, having those details allows the bank to easily locate and cancel the payment.
How to write a check in 6 simple steps
Now that you’re more familiar with a check’s layout, let’s go step-by-step through writing out a check.
There are just six simple steps to filling out a check correctly.
Step 1: Write the date
In the upper right corner, write the date. In the US, dates are written with the month first, followed by the day and the year.
You can use the numerical form or spell the date out:
- 11/17/2025
- November 17, 2025
The date shows when you authorized and endorsed the check.
While you can post-date a check (write a future date), banks often process checks as soon as they’re deposited. So, if you’re trying to delay payment, post-dating isn’t always possible. It’s best to speak with the recipient or wait until you have the funds in your account.
Step 2: Name the recipient
On the line that says “Pay to the Order of,” write the full, correct name of the person or business you’re paying. Accuracy does matter here. Banks will verify the name on the check, so using the wrong name can delay the deposit. In some cases, the check may be rejected altogether.
If you’re paying a business, you may want to ask them exactly who the check should be made out to.
For example:
- “Sunny Cleaners, LLC” vs. “Sunny Cleaners”.
If you’re unsure, double-check the name or put the part of the name that you know, but avoid leaving this line blank.
Leaving the recipient line blank is extremely dangerous; if a check without a recipient gets lost or simply falls into the wrong hands, anyone could fill in their own name and cash it.
It’s also advised not to write “CASH” as the payee. Writing “CASH” makes the check payable to anyone who holds it. People sometimes do this when they want to withdraw money for themselves or give cash to someone without specifying a payee. However, this is risky. If you lose the check and haven’t stopped the payment, anyone can cash it. For security, it’s best to write the name of the person or business you want to pay.
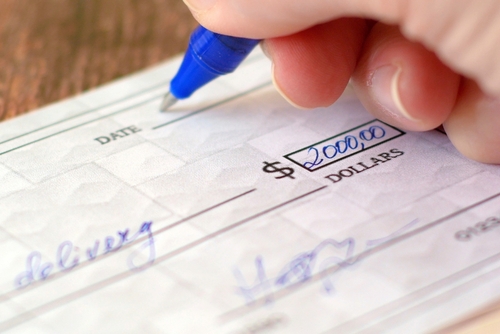
Step 3: Fill in the amount in numbers
In the small “amount” box, write the amount of the check using numbers. For example, $200.00 or $200.10. It’s best to fill the whole box so that no one can add extra numbers.
It’s also important to add “.00” to ensure there’s no doubt about the exact amount.
Step 4: Write out the amount in words
On the line below the recipient’s name (ending with the word “Dollars”), you’ll now write the amount in words. This line helps verify the correct amount. If there’s any discrepancy between the amount written in words and the numerical amount, the written words usually take precedence.
When writing an amount with cents, it’s essential to write the change as a fraction. The fraction is always written “X/100.”
Examples for writing cents on a check:
- $150.75, write “One hundred fifty and 75/100.”
- $50.00, write “Fifty and 00/100.”
- $210.10, write “Two hundred ten and 10/100.”
To make sure your bank withdraws the correct amount from your account, you’ll need to clearly indicate the number of cents—even if it’s zero.
Step 5: Add a memo (optional, but a good idea)
While this step isn’t required, the memo is a great tool for keeping track of what each check payment is for.
Write something short and clear, such as:
- June rent
- Electric bill
- Invoice #1234
- Lisa’s Christmas gift
By adding a memo, there’s no doubt what the check is for. You can easily record this in your checkbook log. You can also take a picture of the check as an extra measure for your records.
Step 6: Sign the check
Finally, sign your name on the bottom right line. This authorizes the bank to release the funds from your account. If the bank has your signature on file, it’s best to make sure your signature matches the one you initially provided. A new signature that looks different could raise a red flag.
Remember: the check will be invalid if there’s no signature on the bottom right line.
Most importantly, avoid signing a blank check with the intention of filling the check later. Anyone can fill in a signed blank check and cash or deposit it, so it’s best to take precautions.
Pro tips for check writing: ensuring your check is secure
Checks are still a safe form of payment when handled correctly. Since they contain personal information, such as your name and banking details, it’s best to handle them with care.
Here are a few simple ways to keep your check secure:
- Use a pen with permanent blue or black ink.
- Sign the check only after it has been completely filled out.
- Keep your checkbook in a safe place.
- Record every check in your log, taking note of the check number, date, payee, amount, and purpose.
- Void checks that are no longer valid and record them in your log, make a copy, and, if possible, shred them after some time has passed. Simply write “VOID” in large letters across the check.
- Mail your check directly at the post office.
New sources have reported stories of checks in the mail being stolen and tampered with. For extra precaution, it’s best to mail your check in a securely sealed envelope, either directly at the post office, through your mail carrier, or through your workplace.
It’s best to avoid placing a check in your personal mailbox for pickup. If possible, hand the check directly to the payee to ensure it reaches them safely.
Going beyond basics: understanding how checks are processed
Knowing what happens after you hand over your check helps you stay in control of your finances. This is especially true if there are any issues after the check leaves your possession.
From paper to processing
When a recipient deposits your check, their bank sends the payment information digitally to your bank. Funds are then withdrawn from your account and transferred electronically to the recipient through the Federal Reserve’s check clearing system. This process usually takes one to three business days, depending on the bank.
Today, you can deposit checks in person, via your bank’s mobile app, or at an ATM. If the recipient calls to tell you they deposited the check, don’t be surprised if your account balance doesn’t reflect the change for another day or two.
If the funds still haven’t been withdrawn after seven business days, it might be best to reach out to the recipient or your bank to ensure there was no issue with the check.
What happens if your funds are low?
If the recipient does not deposit the check immediately and you no longer have the funds to cover the check, it may “bounce.” That means the bank returns the check unpaid. In some cases, a bounced check may also incur fees for you, the recipient, or both, depending on the institution.
This is an important factor to consider if you post-date a check. Post-dating does not guarantee delayed processing. Many banks deposit checks immediately, which can cause your check to bounce if the funds aren’t there. You might ask the recipient to wait until the date listed on the check before cashing or depositing it.
Tracking your balance will help you avoid a bounced check. In some cases, the check may go through, and you’ll end up with an overdraft. If your bank doesn’t offer overdraft protection, you may have to pay overdraft fees.
You can check with your bank to understand overdraft fees and protection, which should be listed on your bank’s website.
Checks still matter
Paper checks aren’t outdated. Digital payments may be more practical at times, but you can think of a check as your old, reliable buddy. When power outages happen or your phone stops working, you can still keep up-to-date on payments by pulling out your checkbook.
Knowing how to write a check is a useful skill to have in your back pocket. Even as digital banking continues to grow, checks remain a trusted and reliable method for transferring money. And with this guide, you can easily and efficiently write out a check whenever you need to.
Do you need more resources on making payments and managing finances? Check out our blog for more!
FAQs
Can I use a future date on a check?
You can post-date a check; however, most banks process the check immediately once it is deposited, regardless of the post-date.
What does it mean to void a check?
If you make a mistake while writing a check or no longer need to finish filling out the check, writing “VOID” across the check in capital letters ensures the check is no longer valid and cannot be cashed or deposited.
Is it safe to send a check in the mail?
Yes, it is generally safe. If you’d like to take additional precautions, the safest way to mail a check is to take it directly to your local post office. You can also hand it directly to your mail carrier instead of leaving it for pickup in your mailbox.