If you recently arrived in Canada, you may have noticed how often people tap their phones or watches to pay for coffee, groceries, or transport. Contactless payments have become a common way to handle everyday purchases, accounting for 58% of all transactions in 2024.
For newcomers, learning how to use Apple Pay can make daily purchases faster and simpler. It’s normal to feel a little intimidated at first or to have questions about setup, security, or whether your bank is compatible. The good news is that Apple Pay is designed to be simple, secure, and convenient, helping you manage your finances with ease.
In this Remitly guide, we’ll walk you through what Apple Pay is, how it works, how to set it up across your devices, and where you can use it in Canada. We’ll also cover common issues you might encounter and explain the security features that protect your money, so you have a clear understanding and confidence to use Apple Pay in your everyday life.
What is Apple Pay and how does it work?
Apple Pay is a mobile payment and contactless method that stores your debit and credit cards securely on your Apple device. Instead of swiping or inserting your physical card at the checkout counter, you simply hold your device near the payment terminal and authenticate the purchase with your fingerprint, face ID, or passcode.
Many retailers, restaurants, and public transport services across Canada already accept Apple Pay, making it a convenient option for a variety of purchases.
Key benefits of using Apple Pay in Canada
Using Apple Pay can make everyday life a little easier. A simple tap with your iPhone or Apple Watch lets you complete transactions faster and more seamlessly, whether you’re buying coffee, groceries, or catching the bus. You don’t need to carry multiple cards, and each payment requires authentication, giving you extra security and peace of mind.
Apple Pay helps you manage spending by letting you store multiple cards and set defaults for regular purchases. If you travel frequently, you can even assign different default cards for different countries, helping you keep personal, rewards, and travel expenses organised.
Its wide acceptance across major retailers, restaurants, government services, and transit makes Apple Pay a flexible tool for day-to-day spending. For newcomers adjusting to life in Canada, it can simplify errands and reduce stress. And for those with accessibility needs, Apple Pay provides a more inclusive way to pay, without handling cash or cards.
Step-by-step: Apple Pay setup
Adding your first card
Getting started with Apple Pay is straightforward and usually takes just a few minutes:
- Open the Wallet app on your iPhone.
- Tap the plus sign in the top-right corner to add a card.
- Select either a credit or debit card.
- Choose to either scan your card with the camera or enter the details manually.
- Your bank will prompt you to verify your card, usually with a text message, email, or through your banking app.
Once verified, your card is stored securely in your Wallet app and ready to use.
Plus, you’re not limited to just one card in Apple Pay. You can add multiple credit and debit cards, which is useful if you want to separate everyday purchases from travel or rewards spending.
Verifying your identity
The verification process can look slightly different depending on your bank. Most major Canadian banks and credit unions, including RBC, TD, Scotiabank, BMO, and CIBC, support instant verification, which speeds up setup.
If verification doesn’t happen automatically, you may need to enter a temporary code sent via text or email, or confirm it in your bank’s app. Occasionally, you might need to call your bank or try again later. This is common and usually resolved quickly.
In most cases, setup is quick and seamless, but it’s also helpful to know which banks and cards support Apple Pay before you start. If you’re a newcomer setting up your finances, choosing a bank that supports Apple Pay can make day-to-day payments much easier. In some cases, you can even begin using Apple Pay before your physical card arrives, saving you time and reducing stress as you get settled in Canada.
Setting up on other devices
Apple Pay isn’t limited to just your iPhone; you can also set it up on your other Apple devices.
- iPad: Go to Settings, click on Wallet & Apple Pay, then add your card the same way as on your iPhone.
- Mac: On newer Mac models with Touch ID, go to System Settings, then click on Wallet & Apple Pay to add your card.
- Apple Watch: Open the Watch app on your paired iPhone, click on Wallet & Apple Pay in the My Watch tab, then click Add Card. From there, you can scan your card or enter details manually and verify with your bank.
Remember, you’ll need to set up each device separately for security reasons. Even if you lose one device, your other devices remain secure.
Using Apple Pay in Canada
In-store payments
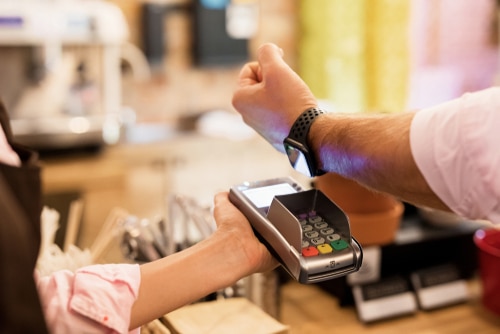
Using Apple Pay in-store is simple once your card is set up. At checkout, look for the Apple Pay logo or contactless payment symbol. To make a payment, hold your iPhone near the terminal, and authenticate the transaction with Face ID, Touch ID, or your passcode. You will feel a vibration and see a checkmark on the screen once the payment goes through.
Online and in-app purchases
Many Canadian apps and websites also accept Apple Pay. Tap the “Buy with Apple Pay” button at checkout, and your payment and shipping details will be filled in automatically. This saves time and reduces errors.
Popular Canadian retailers that accept Apple Pay
Apple Pay is widely accepted, including at Tim Hortons, Loblaws, Canadian Tire, Shoppers Drug Mart, and major fast-food chains. You can also use it for taxis or rideshares like Uber and Lyft, at most major pharmacies for prescriptions, and with food delivery apps such as Uber Eats and SkipTheDishes.
Additionally, public transit systems in major cities like Toronto, Vancouver, and Montreal also support it. For example, PRESTO card readers in Toronto and TransLink in Vancouver accept Apple Pay, making it easier to pay for your daily commute without handling cash.
This means whether you’re buying groceries, commuting to work, or grabbing your morning double-double, Apple Pay is often an option.
You can also check Apple Maps to see whether a store near you accepts Apple Pay—just search for the store and look for the contactless payment icon in the details.
Apple Pay security features
It’s understandable to be cautious about storing financial details on your phone, but Apple Pay is built with several layers of security:
- Near Field Communication (NFC): When you pay in-store, this allows your phone or watch to connect securely with the payment terminal wirelessly when they’re close together.
- Tokenization: Instead of sending your actual card number, Apple Pay creates a unique one-time code (called a token) for each transaction. This means your real card details are never shared with merchants.
- Authentication for every purchase: Every purchase requires Face ID, Touch ID, or a passcode, ensuring only you can authorise payments.
- Device-specific storage: Each card you add is stored only on that specific device, so even if one device is lost or compromised, your other cards remain safe.
Compared with a traditional wallet, Apple Pay often offers stronger protection. Even if someone steals your phone, they can’t make payments using your digital wallet without your authentication.
For extra peace of mind, consider enabling two-factor authentication on your Apple ID, and keep your device software up to date since updates often include the latest security patches. Apple also does not store or track purchases tied to your identity. Your transaction history stays between you, your bank, and the merchant—protecting your privacy as well as your finances.
Troubleshooting common issues
Even with the smoothest technology, small problems can sometimes arise. Here are a few common issues and how to address them.
Payment declined
While Apple Pay is generally reliable, you may occasionally encounter issues. If a payment is declined, the first step is to check that your card is active and has sufficient funds. Make sure your device is close enough to the terminal, and verify that Face ID or Touch ID is functioning correctly.
Card won’t add to Wallet
Double-check that you’ve signed into iCloud on all devices and that you’re using the latest version of software.
If your card will not add to the Wallet app, confirm that your bank supports Apple Pay and that your device’s software is up to date. Sometimes, waiting 24 hours and trying again resolves the issue. If problems persist, contacting your bank for assistance is usually the fastest solution.
Apple Pay not working at terminal
When Apple Pay is not working at a terminal, it could be because the merchant does not accept it. Hold your device at different angles and ensure it is not in airplane mode. Most problems are minor and can be fixed quickly, allowing you to continue using Apple Pay without frustration.
Start using Apple Pay today
Getting started with Apple Pay is easy and free. Once you’ve added your first card, try making a small purchase to get comfortable. Whether paying in-store, online, or in transit, Apple Pay offers a convenient, secure, and widely accepted way to handle daily payments. Beyond convenience, it can simplify your financial information and reduce the need to carry multiple cards.
FAQs
Is Apple Pay safe to use?
Apple Pay uses multiple layers of security. Your card number isn’t stored on your device or shared with merchants. Each transaction uses a unique digital code and requires authentication, making it more secure than a physical card in many situations.
What should I do if my device is lost or stolen?
Use the Find My app to lock your device and suspend Apple Pay. Payments cannot go through without Face ID, Touch ID, or passcode. Once you recover or replace your device, you can re-add your cards easily.
Can I use Apple Pay outside of Canada?
Yes, where contactless payments are accepted. Your bank’s international fees may still apply, similar to using a physical card abroad.
Are there fees for using Apple Pay?
Apple Pay itself does not charge fees. Standard fees from your bank or card issuer, such as foreign transaction fees, may still apply.
Can I link more than one card to Apple Pay?
Yes, you can add multiple cards and set a default for faster payments while keeping others as backups.
What stores accept Apply Pay in Canada?
Apple Pay is widely accepted at major retailers such as Tim Hortons, Loblaws, Canadian Tire, Shoppers Drug Mart, and most major fast-food chains. You can also use it with taxis, rideshares, pharmacies, delivery apps, and many public transit systems in cities like Toronto, Vancouver, and Montreal.